|
My existing reflow oven is working great but it is a radiation oven and I need a convection oven for some of my other projects. I can’t readily modify the existing oven without degrading the reflow performance so I have purchased a brand new Russell Hobbs RHTOV30 Digital Convection Oven.
This page is a product review of the oven’s thermal performance - but not in its intended use for cooking food.
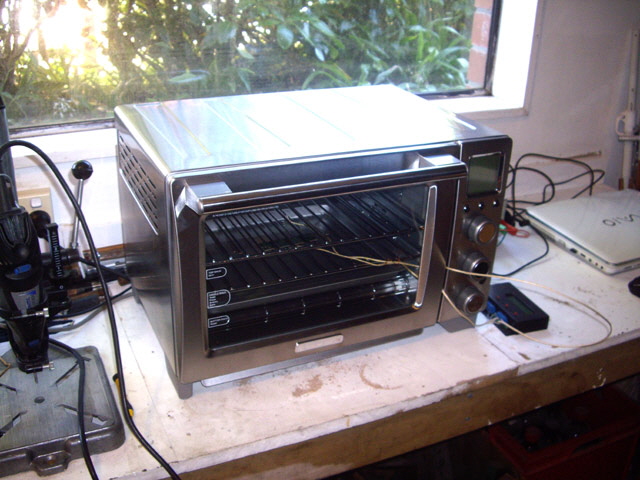
Figure 1. Russell Hobbs Digital Convection Oven RHTOV30
The reasons I purchased this particular oven over others were that:
it was cheap at $130 (marked down from over $200).
it has digital thermal control with timer.
it is a grill and convection oven with a fan, with four elements (two at both the top and bottom of the oven cavity).
it has a robust stainless steel shell (I have burnt the paint off other toaster ovens after extended operation).
On first use there are a number of aspects to the oven that aren’t so good.
The start-stop decal isn’t horizontal (poor QA here).
There is no active display of current oven temperature.
The temperature is only adjustable in increments of 3°C.
The ‘NO pre-heat’ operates in a negative sense (in my opinion it should be the other sense for intuitive operation).
The convection fan makes some noise from time to time.
The maximum temperature is 232°C (good enough for most of my applications and cooking food, but somewhat below the 275 to 300°C available on most convection wall ovens).
The minimum temperature is 65°C. While this is likely to be adequate for most of my use it would have been relatively easy to extend the set temperature down to ambient with an electronic controller.
After reading the manual the best mode was probably Bake with Convection and NO Pre-heat; but Warm (121°C), and Roast might be starters. I figured that the only way to determine what mode would work best for my immediate application (drying and baking printed circuit boards) was to carry out some measurements. These were completed with two K Type thermocouples, one in open air and the other riveted to a 1.5 mm thick green double sided board. They were both positioned centrally in the oven on the lower rack with the lower tray in place. Measurements were logged using my existing oven controller.
I was particularly interested in temperature regulation, overshoot, transient response and the temperature difference between the board and the oven cavity air.
Time for some measurements. Note that in operation all four elements appear to be active. This may not hold for grill mode. In the following graphs TC1 (blue) is the board and TC2 (red) is the oven cavity air temperature. The oven external temperature remains at sensible levels, but the upper surface in particular will get hot after a long high-temperature heating cycle.
Experiment 1. Convection with Preheat
The first heating cycle (Figure 2) was convective bake with the preheat inadvertently turned on. The initial set point after 60 s was 101°C followed by an increase to 179°C after 1,200 seconds.
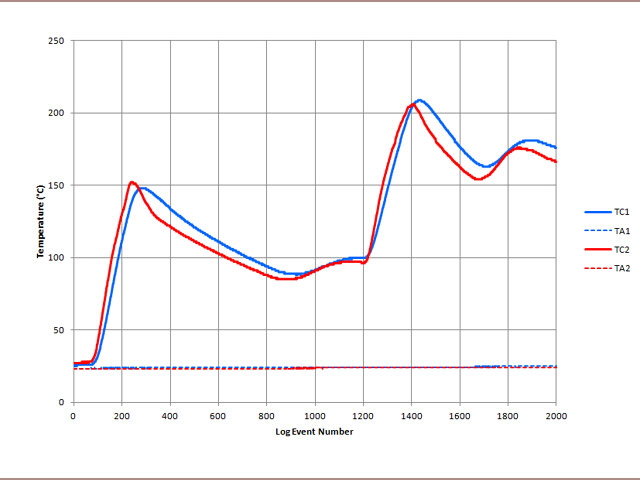
Figure 2. Bake, Convection with Preheat
The preheat is causing a significant initial temperature overshoot of about 50% of the 101°C set point. The air temperature leads the board temperature on heating and cooling. We expect this because of the board’s thermal mass. The temperature takes about 1,100 seconds to stabilize to a board temperature of 100°C and air temperature of 96°C. The long settling time is caused by the preheat. The board temperature settles higher than the air which implies that the convection oven still has a radiative heat component.
The oven took 97 s to heat from ambient to 100°C.
The electronic control was apparent with an under-damped response (decaying oscillations). This response is likely to be due in part to the position of the thermal sensor which is not apparent in the oven cavity and is likely to be fixed to the oven cavity wall. It may also be due to the temperature control strategy. Preheat is definitely not a starter for baking printed circuit boards.
Experiment 2. Convection without Preheat
Test two was convection heating with the preheat turned off (Figure 3). The initial set point after 60 s was 121°C, followed by a 30 s open door transient at about 1,300 s, a temperature increase to 179°C at about 1,800 s, a further 30 s open door transient at about 2,800 s, and closed door cooling after 4,000 s.
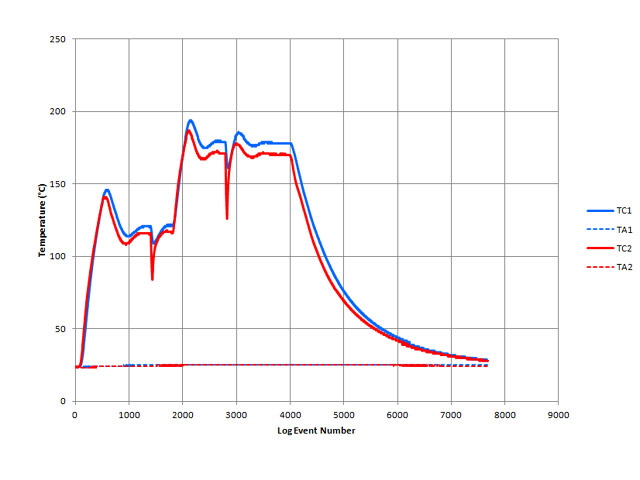
Figure 3. Bake, Convection, No Preheat
There is still overshoot on heating, but reduced to about 20% of the 121°C set temperature with preheat turned off. The oven’s response remains under-damped. The board temperature lags behind the air and settles higher due to thermal mass and radiative heating. Set temperatures were achieved after about 1,100 s with the board being within -3°C and the air within -10°C of the set point.
The oven takes 254 seconds from ambient to 100°C which is significantly slower than the 97 s with the preheat function turned on as in Experiment 1.
The overshoot is not ideal. This is perhaps best addressed by allowing the oven about 20 minutes to stabilize before use, but this won’t help when a mid-cycle temperature increase is set. The transient response to the open oven door was reasonable.
Experiment 3. Convection, No Preheat, Upper Shield
Let’s see if an upper radiation shield will improve the heating performance by reducing the transient overshoots. I placed an 0.7 mm steel sheet on the upper oven tray to prevent direct radiant heating of the board and thermocouple from the upper elements.
The initial temperature was somewhat above ambient because I didn’t allow the oven to fully cool from a previous trial. The board was heated to 121°C from time zero, followed by an increase to 179°C after about 1,900 s. Cooling was with the door closed from 3,000 s followed by door open after about 3,600 s.
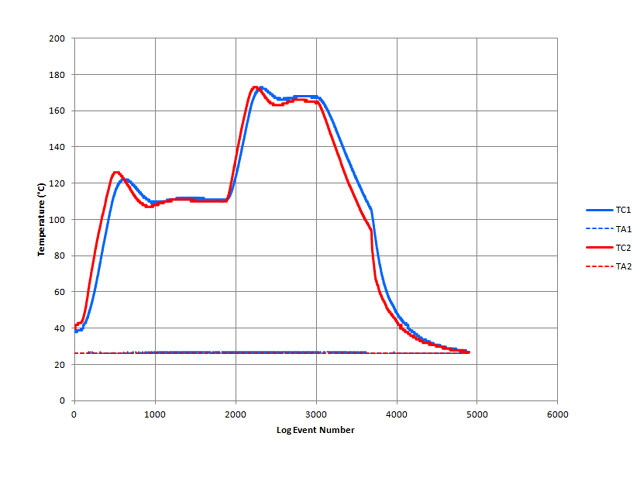
Figure 4. Bake, Convection, No Preheat, Upper Shield
As anticipated the radiation shield reduced the temperature differential between the board and the air and reduced the overshoot, but at the expense of final temperatures about 10°C below the set point. Settling time is still excessive at about 1,200 s but the board is no longer over heated. The radiation shield increased the initial temperature rise rise time to 100°C (estimated to be about 400 s extrapolating for the oven’s initial temperature being above ambient).
The board temperature still lags the air temperature, but the differential in the steady state s significantly reduced to just 3°C (the oven is now performing as a convection oven). This is going to be my preferred mode because the boards shouldn’t be over heated. For long heating cycles and critical heating I can manually increase the temperature by about 10°C after about 1,000 s.
Experiment 4. Warm Mode with Shield
A lot of anticipated use for the oven is drying stuff. Let’s try the warm mode with shield and convection
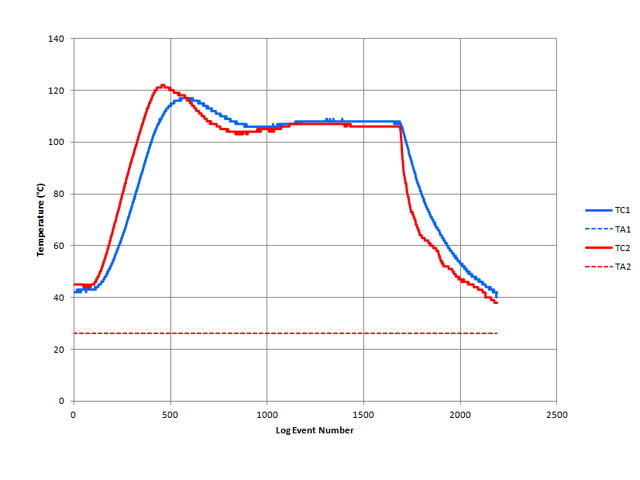
Figure 5. Warm with Shield
The performance in Warm mode is pretty much as for Bake, Convection, No Preheat and with a shield. The final board temperature is 13°C below the 121°C set point, but there is no board overshoot. I figure this will be my go to setting for drying stuff.
In conclusion this isn’t a true convection oven and has performance limitations, but at 1/20th of the cost of a laboratory convection oven it will suit my purposes. The overshoot and lack of precision are not ideal and could readily be improved through the controller design, but there is no way that I can reasonably modify the controller.
For the oven’s intended use of cooking food these limitations are not important and the ovens performance is significantly better than a conventional thermostat controlled toaster oven. In these experiments the thermal mass of the test printed circuit board is actually quite low (although somewhat greater than a free thermocouple in air) and the board has no residual moisture content. Increased thermal mass will reduce the rate of heating, and moisture content will result in a temperature rise plateau at 100°C. These two effects are likely to prevent any significant over-heating due to the initial oven overshoot transient.
Click here to return to the Reflow Oven page or use your browser Click to Go Back arrow.
|