|
Mini Oxy-MAPP Oxygen Cylinder Adapter
I’ve always wanted a real oxyacetylene set but the cost of a basic set is prohibitive at around NZ$800 and then you have the ongoing cost of leased cylinders in addition to paying for the gas. I don’t need to weld stuff every day or for that matter every month so a real oxyacetylene kit is not really justified.
I have a refurbished arc welder which is good for thick stock (say > 3 mm) and it will cut plate with the right electrodes. I have a home made CD dual pulse welder which will do spot welds for battery packs, stud welds and the like (and I am working on the pulse arc in slow time). I can solder all manner of stuff including SMD electronics, and I can do light silver soldering and small brazing jobs with LPG air. But I can’t braze or weld light-to-moderate stock.
I needed to make a wall bracket for an 18 kg LCD TV. The model is less than ten years old but I can’t source the OEM bracket. The commercial universal mount options are relatively cheap but they don’t span two wall studs (600 mm between centres) and I wanted something a little more robust.
The TV bracket was designed from 1 mm thick steel channel recovered from a defunct dish washer, spanning two wall studs at 600 mm between centres and with four TV mounting bolts on the corners of a 200 mm wide x 100 mm high rectangle. However a riveted or bolted assembly caused all manner of design complications. The bracket needed be brazed or welded.
I tried to arc weld the bracket joints on some off cuts with the thinnest rods I could find on the lowest current setting. This was really hit and miss with most attempts blowing holes clean through the channel. If I got lucky and ran a fast continuous bead then I got an almost acceptable weld but the bead was non-existent. Too fast or slow, wrong angle or wrong clearance and either I had bird shit or burn-through. The margins for failure were just too tight.
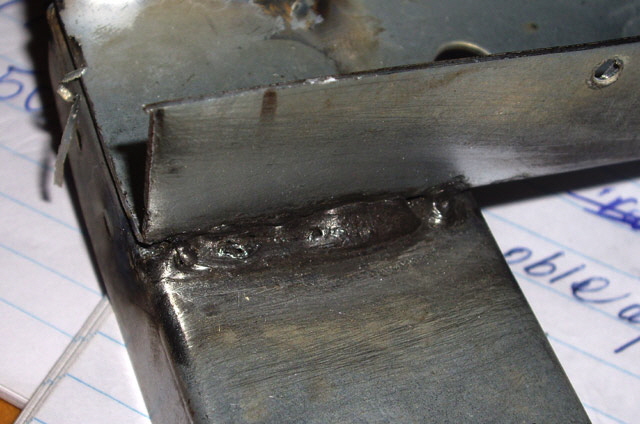
Figure 1. Barely Acceptable Arc Weld
This was my excuse to lash out and buy a mini oxy-MAPP kit. I could only find one low cost kit available – a Hot Devil Kit that promised to weld, cut and braze from Super Cheap Auto for $250. The kit comes complete with disposable MAPP and oxygen cylinders.
There appears to be a more capable mini oxy-MAPP kit on .www called the Oxy-Turbo 90/110. It comes complete with regulators and a real hand piece but this kit is not available in New Zealand and it costs closer to $500.
I purchased a Hot Devil kit and spent a bit of time experimenting on off-cuts before attempting to braze the TV bracket for real. There are no regulators or pressure gauges with this kit. It relies on gas orifices and the cylinder needle valves for pressure reduction. As a consequence gas flow control was somewhat sensitive. However the unit could certainly braze 1 mm thick steel channel.
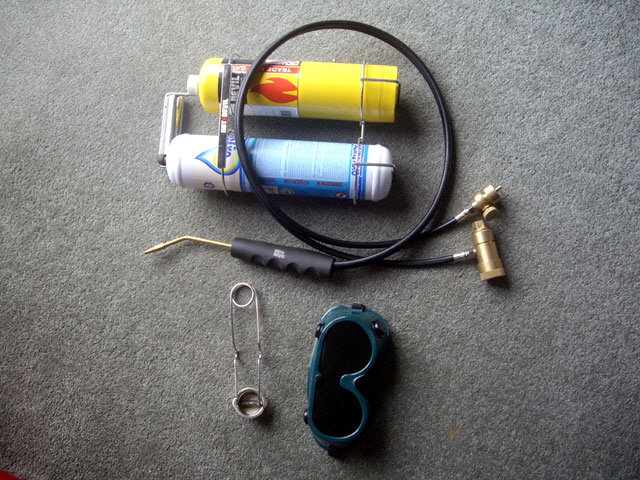
Figure 2. Hot Devil Oxy-MAPP Mini Torch
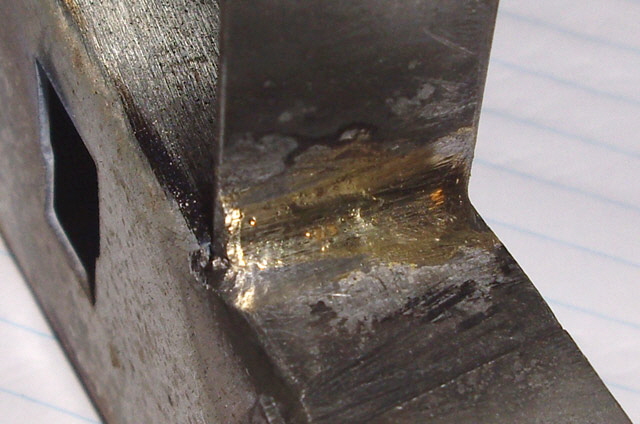
Figure 3. Reasonable Braze on First Attempt with Oxy-Turbo
With my experiments completed it was time to braze up the TV bracket. I had 16 joints to braze, each just 20 mm long. I got half way through the job and the oxygen cylinder was empty! Bugger. I needed to buy another oxygen cylinder at $45. But I could get one of the Oxy-Turbo oxygen cylinders with over three times the oxygen capacity for around $65.
I purchased another Hot Devil oxygen cylinder (40.1 g, 1 litre capacity) so I could finish the TV bracket, and an Oxy-Turbo oxygen cylinder (136 g, 0.93 litres capacity) in the hope of future economy.
We can use the Ideal Gas Law to work out cylinder pressure and gas capacity:
The Hot Devil oxygen cylinder contains:
40.1 g / 32 g/mol = 1.25 mol of O2
The cylinder pressure at 20°C is:
P = n R0 T / V
= 1.25 mol x 8.3144 J/mol.K x 293 K / 0.001 m3
= 3.05 x 10⁶ Pa
= 30 Bar
One mole of (ideal) gas at STP (Standard Temperature and Pressure: 0°C and 101.3 kPa) has a volume of 22.4 litres. At 20°C the volume increases to 24 litres so we have:
24 l/mol x 1.25 mol
~ 30 litres of O2 at 20°C
The Oxy-Turbo oxygen cylinder contains:
136 g / 32 g/mol = 4.25 mol of O2
The cylinder pressure at 20°C is:
4.25 mol x 8.3144 x 293 K / 0.00093 m3
= 111 Bar
(Reality check. The working pressure of the cylinder is 110 Bar so this is about right.)
And we have:
~102 litres of O2 at 20°C
which is 3.4 times the volume of the Hot Devil cylinder.
First things first. I finished the TV bracket. With some 3D printed end caps and TV mounting bolt insulators, and some black paint the finished bracket is tidy, strong and functional. The TV can be easily demounted but it won’t be falling off the wall, and the load is well distributed over two studs.
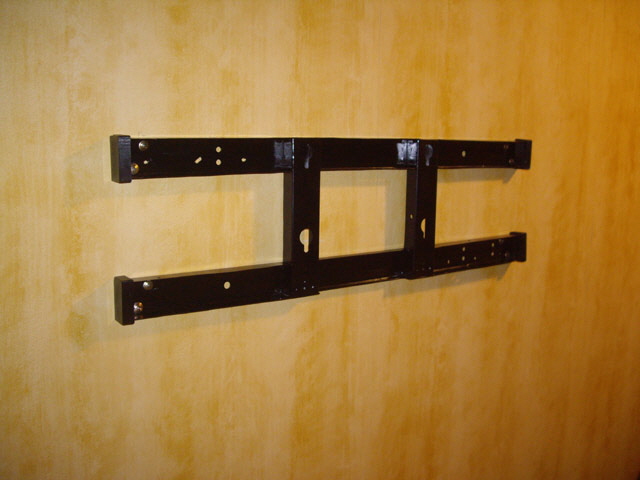
Figure 4. TV Bracket
(Note extra holes from recycled channel)
Now to sort out an adapter for the Oxy-Turbo oxygen cylinder. The fittings on the two cylinders couldn’t be more different. I guess manufacturers do this to force you to use their consumables. The Oxy-Turbo has an M12 x 1.0 mm RH thread and the Hot Devil cylinder has an M24 x 1.25 mm LH thread. The cylinder poppet valves have different actuation distances and diameters. I needed to make an adapter to fit the Oxy-Turbo cylinder to the Hot Devil valve block, complete with a pressure reduction orifice.

Figure 5. Oxygen Cylinder Fittings
After taking measurements from the cylinders and the Hot Devil oxygen valve block I sketched up a design that could be readily machined. My initial thought was to cut the fitting off the empty Hot Devil cylinder and thread or braze this to a machined brass adapter for the Oxy-Turbo cylinder. This approach turned out to be difficult so I reverted to machining the fitting from scratch.
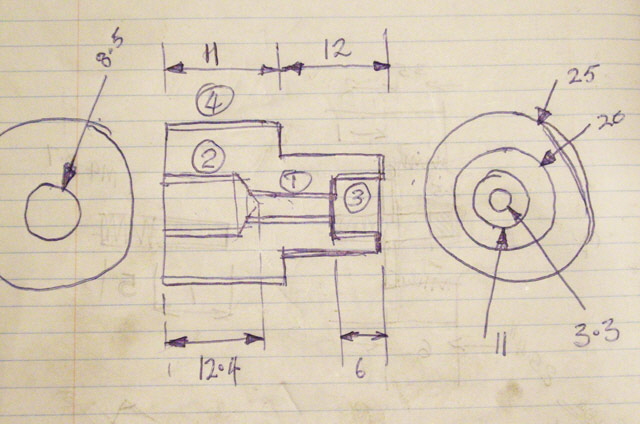
Figure 6. Initial Design
Making the orifice jet could be a problem. The existing Hot-Devil orifice is actually a machined rectangular section groove in the base of the cylinder poppet valve actuator. The groove is just 0.33 mm wide and 0.59 mm deep but extends across the full diameter of the actuator (doubling its effective flow area).
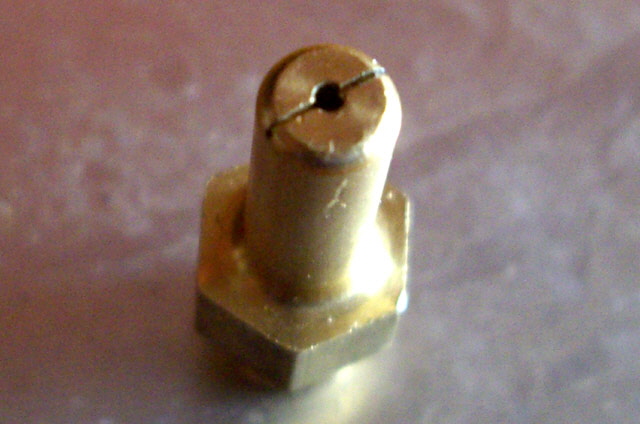
Figure 7. Hot Devil Actuator Slot Orifice
(The body is just 4.8 mm diameter)
The Oxy-Turbo cylinder has a higher standing pressure than the Hot Devil so I may need a smaller orifice. As it happens I have a 1/8” BSP gas orifice plug with an orifice diameter of just 0.2 mm. I’ll incorporate this in the flow path, but it may be too restrictive as the cylinder pressure drops.
I measured the MAPP gas flow rate from the Hot Devil torch at a typical setting for a neutral flame using an inverted 1 litre measuring cylinder in a pan of water. It took about 40 seconds to full so the flow rate is:
The stoichiometric ratio of oxygen to MAPP gas is 4. So theoretically we need an oxygen flow rate of 0.1 l/s. However as we turn on the oxygen this increases the pressure at the mixing port in the hand piece, creating back pressure that reduces the flow of MAPP gas through the cylinder control valve.
I have calculated the back pressure increase at the mixing port to be about 83 Pa with MAPP and oxygen flowing for a neutral flame. This causes the MAPP mass flow rate to drop from the initial setting of 0.045 g/s to about 0.008 g/s, while the flow rate at the torch tip increases from 0.025 l/s to about 0.048 l/s.
Based on the Hot Devil instructions (which are actually not much chop) an oxygen cylinder should be good for 20 to 25 minutes of welding or brazing. This was about the actual usage I got from the first cylinder. This means that the actual oxygen mass flow should be in the range of 0.026 to 0.033 g/s which compares favourably with my calculated oxygen flow rate of 0.025 g/s.
My calculations are approximate based on the Ideal Gas Law (above) and the orifice equation:
They assume adiabatic flow at constant temperature through the numerous orifices, and subsonic kinetic flow (as opposed to viscous flow) which are reasonable assumptions for what are low mass flow rates with small orifices. While the maths isn’t particularly complicated (nothing more difficult than solving a quadratic equation) it is somewhat protracted and tedious so I won’t be posting it. Email me if you really need this.
For starters I needed some solid round brass stock at least 25 mm in diameter. I thought I had some 32 mm diameter stock somewhere but all I could find was a 20 mm long off-cut. I guess I have used it up over time. Unfortunately this was the weekend and the local metal merchants were closed. But I have a heap of scrap brass so maybe I can cast enough for this job? This will certainly be cheaper than paying about $180 for more stock and, all going well, it will be available this afternoon. This is also a good opportunity to test my furnace at a higher temperature than my initial aluminium experiments at around 660°C.
I knocked up a sand mold with 40 mm diameter cylindrical patterns. As an aside I used the base of the old Hot Devil oxygen cylinder as a crucible. This was most satisfactory. The initial brass charge was molten after just 15 minutes (somewhere in the range of 900 to 940°C). The remaining brass was added to the charge over 15 minutes to about 1.5 kg total weight. I removed the dross (there was an awful lot of this and I suspect much of it was oxidized zinc) and poured the mold. Maybe I should be adding some more zinc? I can get a few grams from used zinc carbon batteries. Oops! My pouring basin wasn’t big enough resulting in overflow, burning the flask and causing a skipped (non-continuous) pour with uneven filling of the two molds. Hopefully I have enough solid brass in the castings to do the job.
After cooling I knocked out the castings, cleaned and then machined them to solid. There was a huge concealed sink hole at the top of each casting and about 3 mm of wall thickness that was not perfectly sound. The sink holes were the result of having the top of the casting open to the air where is cooled quickly, preventing riser action.
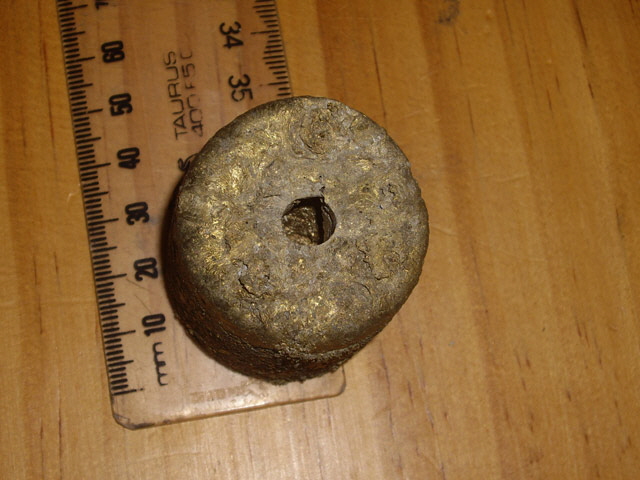
Figure 8. Sink Hole (Partially drilled out)
I figure that the sand was also a bit dry and the pour rate too fast, creating the rough walls. The castings had a very thin zinc-coloured skin before machining. I understand that this is condensed zinc and can be prevented by closing the mold cavities and tilting the casting flask to ensure that the sprue remains choked.
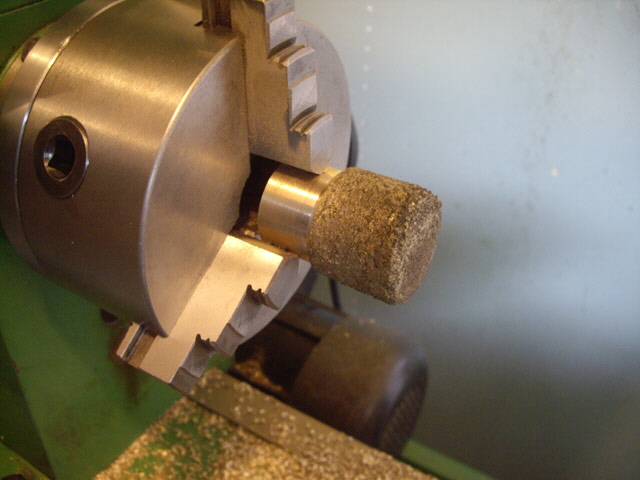
Figure 9. Machining the Brass Castings to Clean Solid
After machining I had two pieces of 35 mm diameter brass, one about 50 mm long and the other 30 mm. I calculated their volume and weighed them. They were almost certainly solid within 1% of calculated weight with an assumed density of 0.0085 g/mm3. The smaller piece will be adequate for the valve fitting.
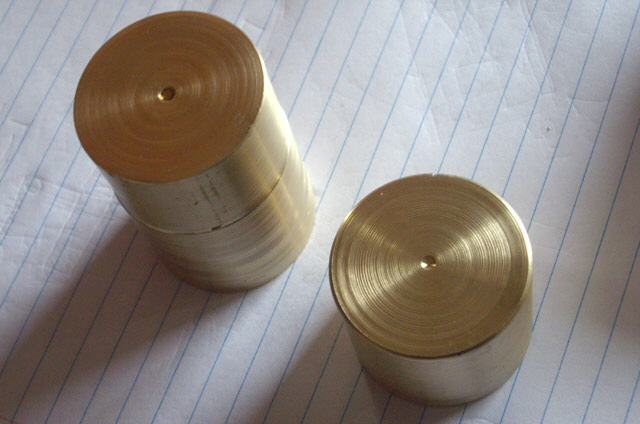
Figure 10. Solid Brass Stock
I machined up the basic fitting and started making the threads. The two threads that mate with the cylinder and the valve block needed to be machined but others were cut with taps and dies. The last thread to be cut was the Left Hand (LH) male M25 x 1.25 mm equivalent of the Hot Devil cylinder thread. I have never had cause to machine a left hand thread on my lathe. While the lathe change gear plate has a slot for mounting an idler gear to reverse the lead screw there is no gear bearing mount.
So now I needed to make a gear bearing mount comprising three pieces, each 30 mm in diameter. That second piece of cast brass was about to get used. With the idler gear in the train everything was good to go. I machined the final thread and the fitting body was made.
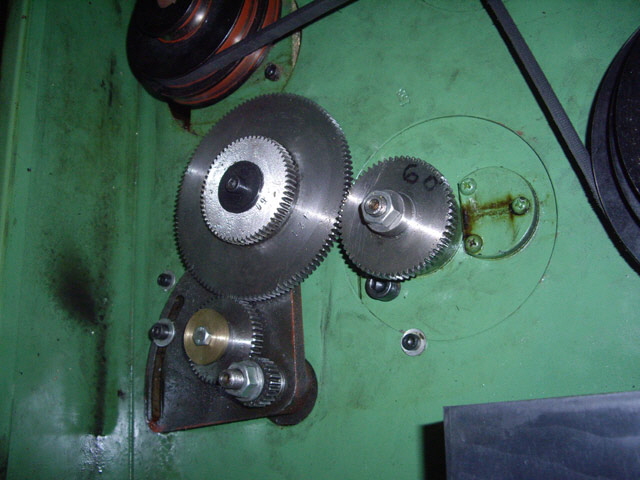
Figure 11. Idler Gear Bearing Mount (brass cap)
Next I had to make the Oxy-Turbo cylinder poppet valve actuator. This is quite a small part and the length is critical to ensure that the cylinder is cracked open when the fitting is almost fully seated. It also has a very small (0.5 mm diameter) hole acting as an initial pressure reducing orifice. I machined the actuator from 6 mm round brass, bored to 2 mm diameter for a depth of 10 mm. The thread was cut with an M4-0.7 mm die. The small hole was drilled by hand with a Dremel using an 0.5 mm diameter tungsten carbide PCB drill at full speed.
I didn’t have an appropriately sized O ring so I cut a compression washer for the Oxy-Turbo cylinder recess from 1.5 mm thick rubber sheet using a cork borer set. It was a perfect fit.
Everything was cleaned with hot soapy water and dried before testing. Compressed oxygen reacts with oil or grease and can cause fire or an explosion, and any swarf might ruin a gas seal or block one of the jets. I unscrewed the Hot-Devil cylinder poppet valve actuator from the base of the existing valve and stored it away safety in case I need to use it again.
With safety glasses on I fitted the adapter to the oxygen valve block and connected the Oxy-Turbo cylinder. The good news is that nothing flew to bits but three issues were immediately apparent. The oxygen cylinder cracked well before the cylinder fitting was seated causing a temporary leak until the cylinder was fully homed, the fitting-to-valve connection was leaking, and the left hand - right hand thread combination made tightening stuff difficult.
I needed to reduce the poppet actuator clearance from 2.5 mm down to about 1.5 mm, work out what was causing the adapter-to-valve block leak and fix it, and add a hex to the fitting for a spanner. Note that this is just an anchor point - the adapter is only hand tightened as excessive force will either damage the relatively fine threads or cut the seals.
While I would have liked to turn down the poppet actuator, the bore was already approximately 2 mm from the end so I added a couple of turns to the M4 x 0.7 mm thread instead.
The adapter was not sealing in the valve because I hadn’t allowed any clearance for the original poppet actuator mounting boss. I removed the gas orifice from my fitting (if necessary I could turn this down to length later) and recessed the fitting 2.25 mm deep at 15 mm diameter.
Next I cut a hex fitting on the body of the adapter. This wasn’t machining that I am particularly proud of because of problems with mounting the fitting for milling. Ideally this should have been machined before cutting the threads and not as an after-thought. I wrapped the M25 LH thread with aluminium shim to protect it and put this in a three jaw chuck. However the adapter kept deflecting under the milling cutter, even with very light cuts resulting in an imperfect hex. In retrospect I should have made a threaded mandrel for milling the hex between centres but the damage has been done. While my pride is hurt the adapter is still functional.
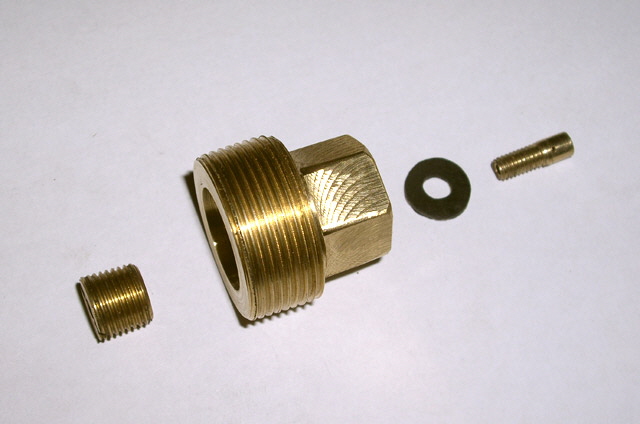
Figure 12. Adapter (Note Left Hand Orifice Plug is Redundant)
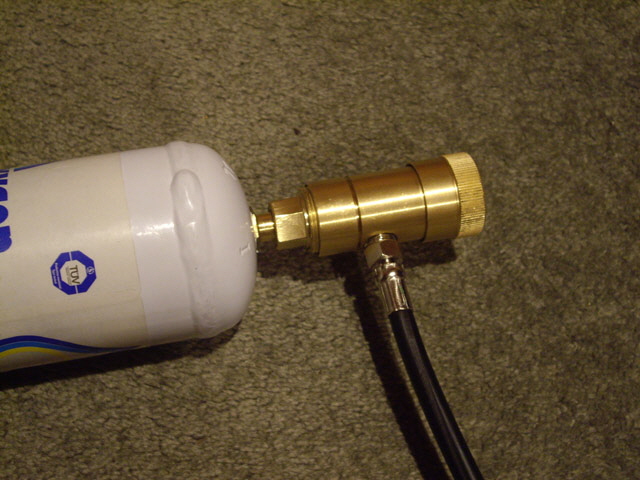
Figure 13. Assembled Adapter
Back to testing (with fitting cleaned and safety glasses on). The hex works well and the adapter-to-valve block fitting feels smooth and secure. Now for the Turbo-Oxy oxygen cylinder. No leakage occurred at all when it was connected to the fitting. Perhaps I have over-compensated with the poppet actuator? I opened the valve and there was a readily adjustable steady flow of oxygen. Whoot! The adapter was working perfectly without the jet orifice.
The acid test is to set a flame on the torch. If anything it is working much better than the OEM device. I’ll have no problems welding or brazing with this although I still haven’t tried cutting. The oxygen should last at least three times longer than the original Hot Devil cylinder at about half the price. I tried to photograph a neutral flame in Figure 13 but struggled to set the camera exposure right to show the inner blue cone.
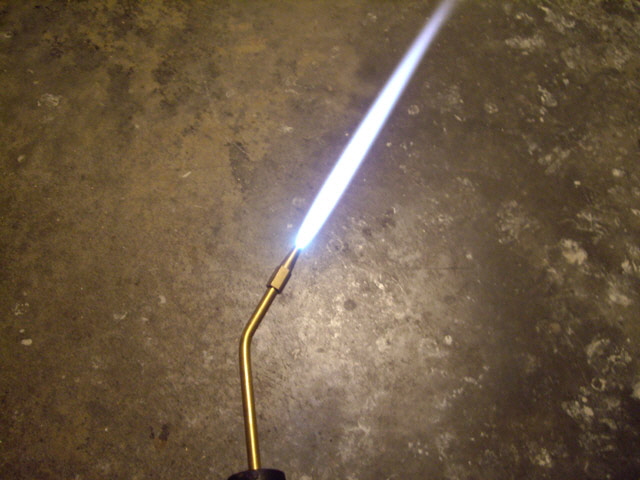
Figure 14. Flame Test
As an side, machining the cast stock proved that it was solid with no inclusions or cavities. The machining produced a heap of relatively clean brass swarf. The adapter and gear bearing mount comprise only 20% of the starting brass stock. I’ll be putting the swarf back in the furnace and converting it back into round bar.
Here is the drawing for my fitting for those that that want to make one. I have adjusted the adapter length so that the original cylinder actuator doesn’t need to be removed. Be warned that this will probably be a challenging job for novice machinist.
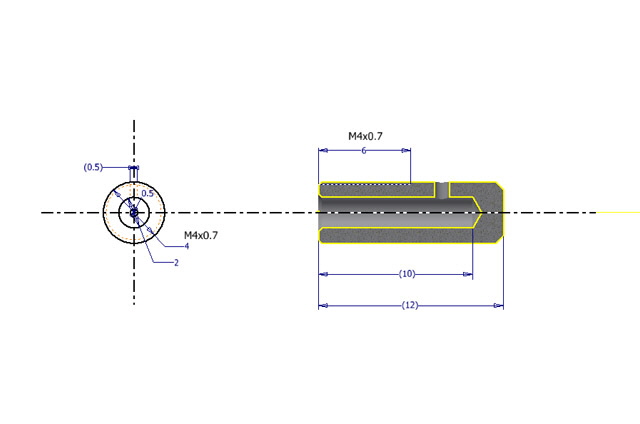
Figure 15. Actuator Drawing
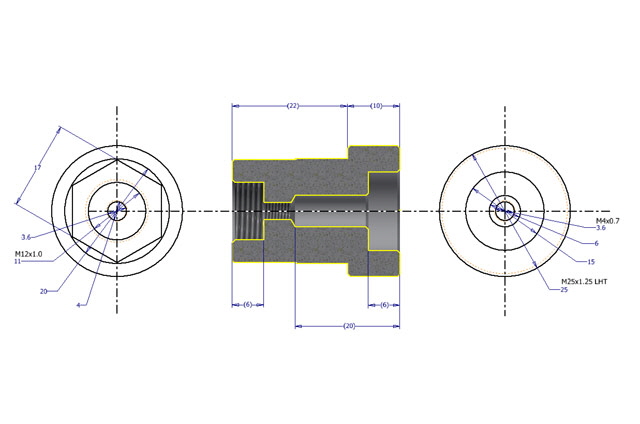
Figure 16. Modified Body Drawing
I have been doing some welding with the new adapter including stainless steel which can be a challenge to weld with gas. The results have been excellent (even taking into account my poor welding technique).
Please email me with any thoughts, suggestions or criticisms.
Follow-up
A few folk have contacted me asking if I make them an adapter. Thank you for these inquires. While I can do this for you I am not set up for commercial production of these adapters and I have other commitments on my time. In particular I do not have a CNC or capstan lathe, or the taps and dies for the two critical cylinder threads. And I do not hold stock lengths of appropriate diameter brass rod. Setting up a lathe to cut precision threads for gas work takes time, and making and testing a fitting takes the best part of a day.
Please appreciate that my time is as valuable as yours. In the western world you will struggle to find a machine shop that will make a one-off for less than about $250 including materials. However my adapter has already saved me this much and more in oxygen in just a couple of months of intermittent welding and brazing work. That said, the drawings above are provided for free and they will save you a heap of expenditure if you should choose to have an adapter made.
Several Years On...
After a lot of frustration with the valve sensitivity on the oxy-turbo handset valves I lashed out and purchased a tradeflame™ oxy-MAPP handset about a year ago. This set has a number of improvements over the oxy turbo™ handset including regulators at the cylinders, cylinder pressure gauges, flash back arrestors and valves at the hand piece.
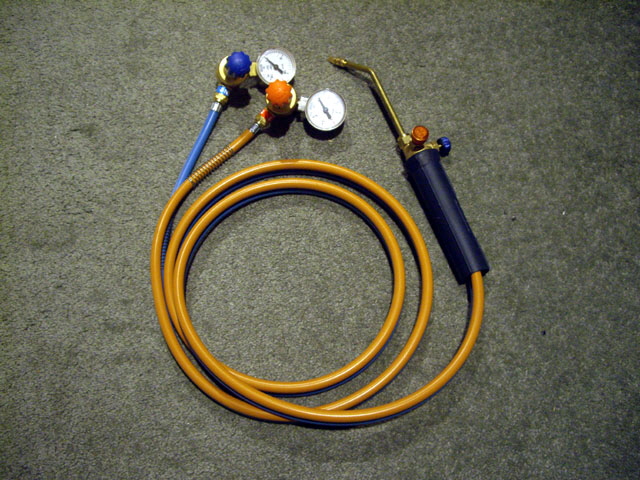
Figure 17. Tradeflame Mini Oxy MAPP handset
The tradeflame MAPP cylinder fitting is identical to the Hot Devil set, but the oxygen fitting is an M10-1 thread. I have a few disposable oxygen cylinders left but they are all M12-1 fittings. So I needed yet another adapter. The design is similar to my previous adapter, but with O ring seals and appropriate length, diameter and thread adjustments. The two parts for the new adaptor were machined in a day. The M4-0.7 thread was cut with a tap. The M10-1 external and M12-1 internal threads were machined.
The parts were thoroughly cleaned and degreased before assembly.
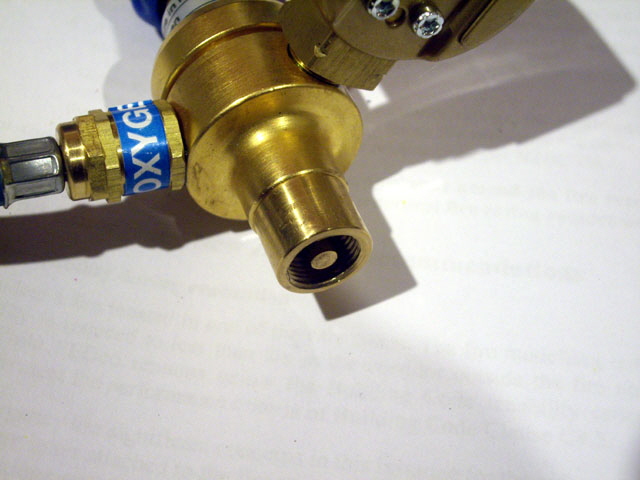
Figure 18. M10 to M12 Adapter Fitted to Oxygen Regulator
On first connection I had no leaks - but no oxygen. My first thought was that the cylinder valve actuator wasn’t long enough. After testing the cylinder on my original fitting it appears to be empty. I repeated the experiment with a second cylinder and this also appears to be empty. Darn. I’ve been keeping the empty cylinders to turn into crucibles for my gas furnace. Maybe I should have labeled them as empty?
The third attempt with a new oxygen cylinder and the pressure gauge showed ~100 bar. The regulator and hand piece valves on the tradeflame set work well without the sensitivity of the oxy turbo set, and we have no leaks.
With the new adaptor tested it was time to remove the regulator from the cylinder. The procedure for this is:
Turn off the regulator.
Turn on the hand piece valve to bleed the hose.
Turn off the hand piece valve.
Disconnect the regulator from the cylinder.
BANG!
Once the end of the thread had been reached the fitting blew clear of the cylinder with a deafening retort. The reason was that the O ring had dislodged and was pressed onto the top of the cylinder, preventing the upstream side of the regulator from venting through the thread. Thankfully there was no damage.
This problem does exist on real oxygen cylinders because the cylinder has its own valve. Once this is off you can bleed the regulator and the line before disconnecting the cylinder.
There are a number of solutions to this problem. I can machine a larger recess at the root of the M12-1 internal thread to retain the O ring and fit a slightly larger O ring. Or I can drill a small bleed hole (say 0.5 mm diameter) through the adapter body about 2 mm above the O Ring. I opted for the latter and the problem was resolved.
Having made the adapter I went shopping for a new disposable oxygen cylinder (I like to keep at least one MAPP and oxygen cylinder on hand to prevent running out of gas mid-job). Bugger me. I couldn’t find an oxy-turbo cylinder with an M12-1 fitting anywhere. The only disposable oxygen cylinders I could find were for the Hot Devil torch (with an M20 left hand thread and very expensive for such limited oxygen capacity), and for the tradeflame torch (M10-1 right hand thread). So my original Hot Devil torch will need a new adapter for an M10-1 disposable oxygen cylinder, and my new adapter is redundant!
The Saga Continues ...
On a recent job I had some 1” galvanized steel pipe with a 3 mm walls to bend and flatten to repair my lawn mower handle. I fixed these about 18 months ago as a temporary repair with some recycled steel tube that was way too light for the duty (1.2 mm wall as opposed to 1.7 mm for the original part). The new pipe is strong and it won’t budge without a serious press when cold. The solution is to heat the pipe in the crush and bend zones to >800°C. At this temperature the yield strength of mild steel reduces to about 10% and can be readily bent or crushed using a vice. For bends fill the pipe with sand to prevent buckling. While the Hot Devil and Trade Flame torch flames are hot enough for this job but they simply don’t produce enough heat.
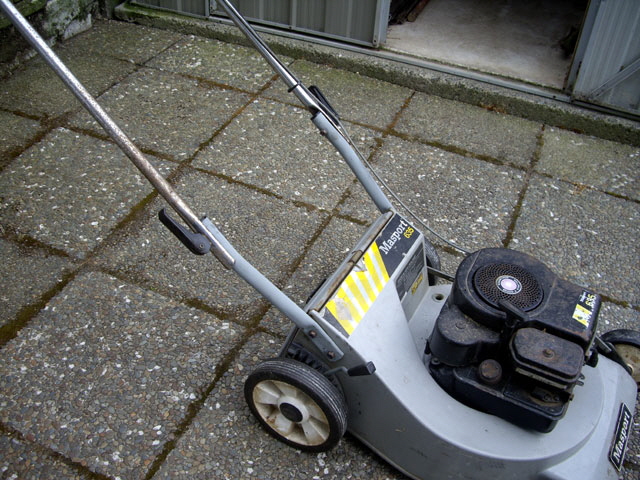
Figure 19. Lawn Mower Handle
(Repaired)
It was time to go and buy a real oxyacetylene hand piece and sign up to a gas bottle swap scheme. I found a brand new welding torch set discounted at NZ$270 + GST. It includes regulators with cylinder and output pressure gauges, flash-back arrestors, hoses, spanner, jet cleaner, and both welding and cutting attachments for the hand piece, and a reasonable set of welding goggles.
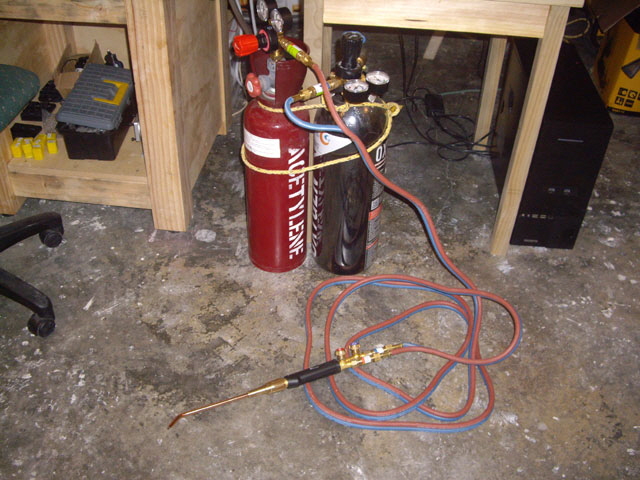
Figure 20. Real Oxyacetylene Set ...
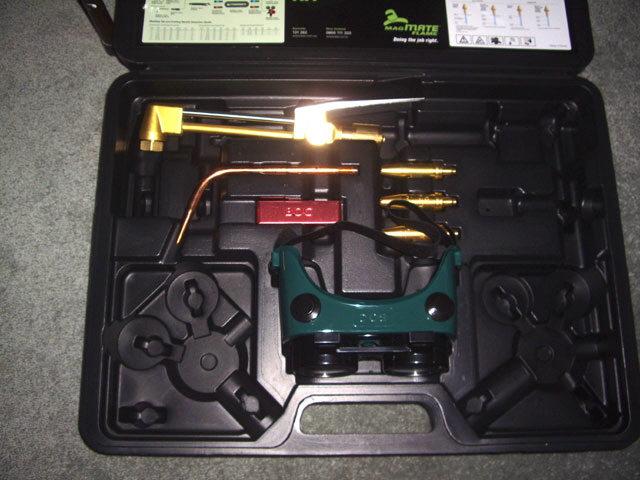
Figure 21. and the Cutting Torch and Accessories
With the right nozzle the cutting torch can cut 100 mm (4”) plate steel at a rate of 150 mm/min (6”/min)! I also purchased two additional welding nozzles and pack of mild steel filler rod. So the price of a real oxyacetylene torch was comparable to an oxy-MAPP mini torch and it is significantly more versatile.
The best deal I could find on the cylinders required a refundable NZ$250 per cylinder deposit. Having paid the deposit you simply return the empty cylinders, pay the refill charge, and you’re back in business. One advantage of exchange programs is that you avoid the cost of routine cylinder tests and certification. The refill fee is about NZ$80 for oxygen and NZ$125 for acetylene. This is similar to the cost of a disposable cylinder, but the D sized exchange cylinders have about twenty (20) times the gas volume. And with increased gas capacity you can really push up the delivered heat, weld all day, or cut some seriously thick plate steel. The only disadvantage is that these cylinders are moderately sized and heavy which are somewhat less portable than the mini set.
The new cylinders are not compatible with the mini handsets because their standing pressure is too high for the gauges and valves. While they could be run off the regulators I won’t be making adapters for these.
The corollary of this story is that if you need to do gas brazing, welding or cutting for more than say four hours a year, or you need a lot of heat or real cutting capacity then don’t buy a mini torch set. You’ll be spending more on disposable gas cylinders than the cost of a real oxyacetylene kit.
|