|
Lots of folk seem to have issues with setting the build plate level at Z=0 on the Elegoo Saturn 2 SLA printer. This is really important for successful printing. But I assure you that the Elegoo instructions and spacer don’t work. So here is a simple quick step-by-step guide to making the build plate level with the FEP and at Z=0.
Before I launch into the procedure I’m going to make a few statements of fact.
True Z=0 is with the build plate in contact with the FEP sitting on the LCD.
True Z=0 is not with the build plate at some arbitrary height above the FEP.
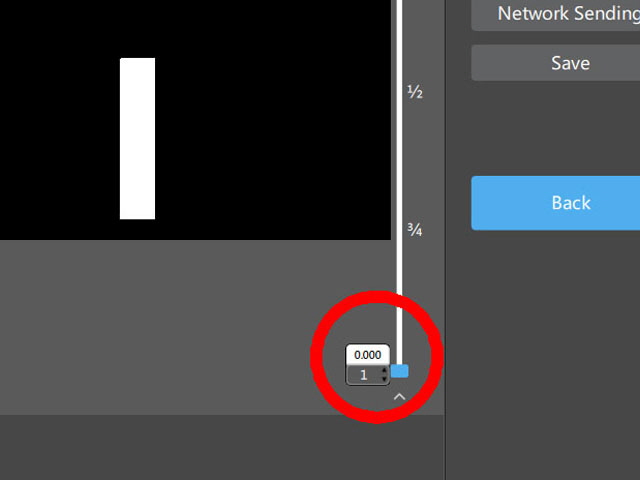
But for the Saturn 2 using Chitubox as the slicer Z=0 is not True Z=0. It is actually at the first layer height which defaults to 0.05 mm. If you don’t believe me then look at the first layer height of your model in Chitubox. It will be at 0.000 mm. You cannot print a zero thickness first layer as It is physically impossible to squish you resin to zero thickness on the first layer in a sensible time frame, and in any case a zero thickness layer serves no useful purpose.
Z=0 on the Saturn 2 is at the first layer height above the FEP.

Figure 1. First Layer Height at 0.000 mm in Chitubox
Don’t use the spacer card that came with your Saturn 2. It is too thick.
The FEP that comes with the Saturn 2 is almost exactly 0.150 mm thick, but is subject to stretching slightly thinner to say 0.13 mm over time. But other types of release film will likely have a different thickness. I recently purchased some replacement FEP film and it is 0.127 mm thick.
The Elegoo spacer card is 0.32 +/- 0.01 mm thick. So if you use this card your first layer will be between +0.16 and +0.20 mm thick. This is three to four times thicker than the default layer height for the Saturn 2. So don’t use the Elegoo supplied spacer card.
We can level and set True Z=0 on an empty resin vat or a spare sheet of FEP but this isn’t very convenient and it isn’t appropriate for the Saturn 2.
A sheet of 80 g/sq m paper is almost exactly 0.10 mm thick. Two thicknesses are 0.20 mm + 0.01 / -0.00 mm (based on numerous actual calibrated measurements). This is a perfect spacer for leveling and setting the Saturn 2 at Z=0. A4 paper is just a few cents a sheet, and environmentally friendly (in fact really good carbon capture). With two sheets of A4 as a spacer our initial layer will be between 0.03 and 0.08 mm thick, even with stretched FEP. This is approaching the layer resolution on the Saturn 2.
When setting Z=0 and leveling the build plate don’t press down firmly on the build plate. I’ll say that slightly louder.
Don’t press down firmly on the build plate.
This is contrary to Elegoo’s instructions. The build plate is already under spring compression against two thickness of paper. But it is impossible to press down on the build plate without causing it to rotate sightly off horizontal, perhaps by as little as 0.06 degrees. At the edges of the build plate this rotation appears as a change in clearance of about 0.10 mm.
With the discussion out the way here is the procedure that I use followed by a captioned video.
Remove the resin vat.
Tighten the build plate top screw to secure it to the Z axis.
Loosen the two hex cap clamping bolts on the build platform with the hex key provided and confirm that the build plate is free to rotate and lift without resistance.
Check that the build plate and LCD are clean.
Place a folded sheet of A4 80 g/sq m paper on the LCD (two thickness of paper).
Use the touch screen to home the build plate and rotate it square with the edges of the LCD.
Hold the build plate gently in place without firm downward pressure while progressively tightening the two hex cap clamping bolts, initially finger tight and then using the hex key.
Use the touch LCD screen to set and confirm Z=0.
Now raise the build plate using the touch screen about 10 mm, remove the paper, and re-home the build plate.
Test for level with a single sheet of A4 paper. It should slide freely between the build plate and the LCD across the full area of the build plate. If it does then we’re done. Raise the build plate say 100 mm and refit the resin vat.
If the paper won’t slide between the build plate and the LCD then note where it is jamming. Repeat setting Z=0 but this time apply gentle downward pressure on the diagonally opposite side of the build plate from where it was jamming and repeat the clearance test.

Click on the Image to Link to the Video
A question that comes up from time to time is how often should you set Z=0 and level the build plate?
Level and Z=0 shouldn’t change appreciably, even with changes in ambient temperature. But you should repeat the procedure any time:
a model failure causes the stepper motor to skip, or
a correctly exposed model fails to adhere to the build plate, or
you manually rotate the Z axis lead screw, or
the build plate moves under the clamping bolts, or
you replace your FEP.
I used to level my Saturn 2 after sitting idle for more than a few days or a print failure, but now I set it and forget it. It’s been months since I last leveled and reset Z=0. My successful prints remain dimensionally accurate and the reason for my failed prints has had nothing to do with level or Z=0.
Click on Removing Prints to link to another page on the Saturn 2.
|