|
From time to time I need to sharpen my hand planes, chisels and saws for woodworking projects. Sharp tools are essential for woodworking, making for accurate, quick and relatively effortless work. Sharp tools reduce the requirement for finishing operations such as sanding, and help prevent turning perfectly good wood into kindling. In my experience sharp tools (including kitchen knives) can also reduce the incidents of accidental cuts because they initiate a cut at the point of application without slipping and require less force than a blunt edge. However a cut injury with a sharp tool is likely to be severe.
There is no Standard for sharpness. Intuitively we know that a new razor blade is going to be sharp, and that a blunt chisel won’t make a clean cut in wood and will require brute force to affect a cut. With enough force even a piece of paper or straw can penetrate wood as evidenced in the aftermath of severe storms.
Interestingly, one of the sharpest edges known is a 90 degree broken plate glass edge. These are used for making very thin slices of frozen or epoxy coated specimens for microscopy. Just like a glass edge, guillotines and other scissor action tools do not have acute cutting angles but they can still be sharp.
So how do we measure sharpness if there is no Standard? Human touch is remarkably sensitive and many folk will feel for a sharp edge by running their thumb perpendicularly across it. This test is not definitive because microscopic blade serrations feel sharp but actually produce a relatively rough cut, and in some cutting applications these serrations are actually desirable. Shaving arm hairs is probably a better representation of sharpness but, just like the thumb test, may have unintended and bloody consequences. My preferred test is to cut an unsupported sheet of paper through the edge without force or tearing (scary sharp). But the proof test of sharpness is fitness for purpose. So for chisels and planes it is cutting across hardwood end grain which is probably their most challenging use. A sharp blade will take a fine even shaving with minimal hand pressure.
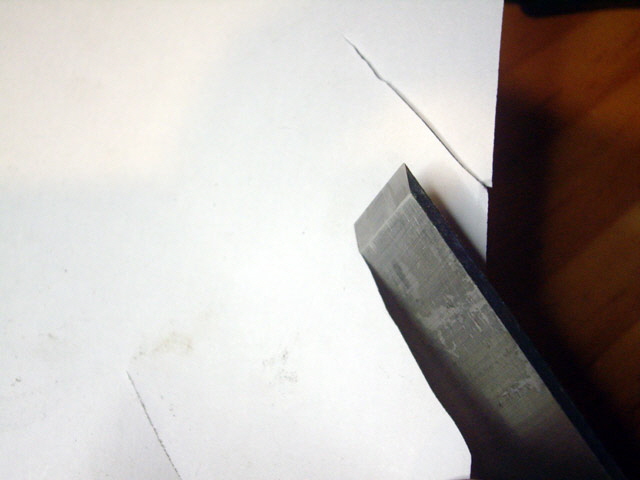
Figure 1. Scary Sharp Chisel Blade
My preferred sharpening angle for chisels and planes is 25 degrees and I don’t use micro bevels as a matter of course. This angle is often ground at the blade manufacturers but don’t be fooled into thinking that a ground blade straight off the shop shelf will be sharp. While larger cutting edge angles (up to say 30 degrees) should maintain their edge longer, other factors such as the steel hardness and how the tool is used are equally important.
Note that most of my cutting tools are put away sharp, clean and oiled, with the main exception being my 3/4” basher’s chisel that lives in my builder’s apron. I found this chisel in a concealed roof space about 15 years ago in terrible condition complete with rust pitting so it owes me nothing. It is constantly abused for rough work and as a lever for opening tins of paint and the like. It is usually blunt, although still somewhat sharper than a screw driver. Occasionally it finds a nail (or worse) which prompts me to sharpen it on a bench grinder. The blade was short when I found the chisel but as a consequence of numerous regrinds it is somewhat shorter today.

Figure 2. Blunt Basher’s Chisel
Getting a consistent cutting edge angle and keeping the cutting edge square with the blade shank by hand is tricksy for most folk. Even small variations between successive sharpening results in having to spend too much time at the oil stone. However a simple honing guide should make for the same cutting angle with a square cutting edge every time.
A problem with cheap (say $20 to $30) honing guides is that they are not precision jigs and, depending on the model, can result in all manner of problems preventing you from obtaining a sharp square tool blade. You can improve these cheap offerings with a bit of filing or machining but don’t expect to end up with a quality precision jig no matter how much effort you expend.
I’ve been using two low cost honing guides for the last twenty years. The were both pretty hopeless from the go-get (which is why I have two). Despite some hand machining these guides have poor clamping, excessive slop in the roller/s and guide rods, poor machining/casting tolerances, and a host of other issues. I have persisted with these jigs until a week or so back when the knurled clamping nut on one fractured under moderate finger pressure, and I could not set a consistent square cutting edge on a plane blade with the remaining guide. The rollers are severely worn on an uneven axle and measurements show that the frame is twisted.
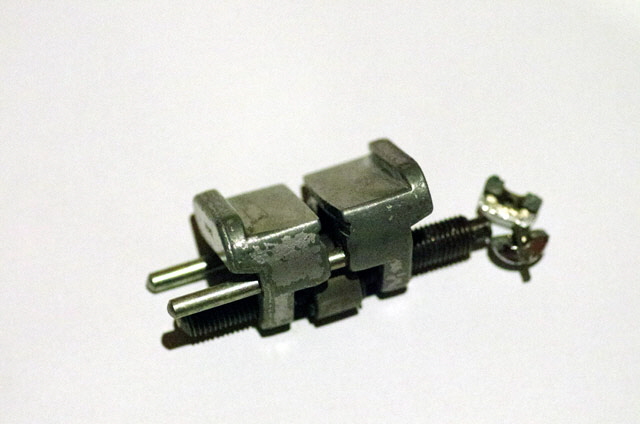
Figure 3. Nasty Low Cost Die Cast Honing Guide
(Split clamp knob on the right.)
Precision honing guides (Lie Neilson and Veritas for example) do exist but they are expensive for a weekend woodworker (expect no change from $200 less accessories), they require a bit of faffing-about setting them up, and they still aren’t perfect. See https://www.youtube.com/watch?v=O_adhVrZFws for an interesting review.
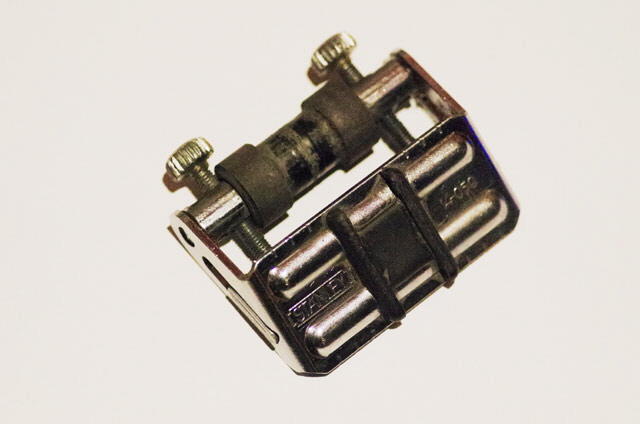
Figure 4. Another Nasty Cheap Honing Guide
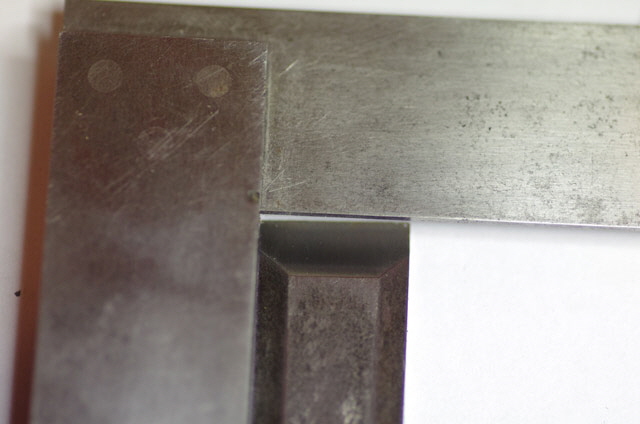
Figure 5. Cheap and Nasty Honing Guide won’t Set Consistently Square
(I’m 2 degrees off here on an 18 mm wide chisel!)
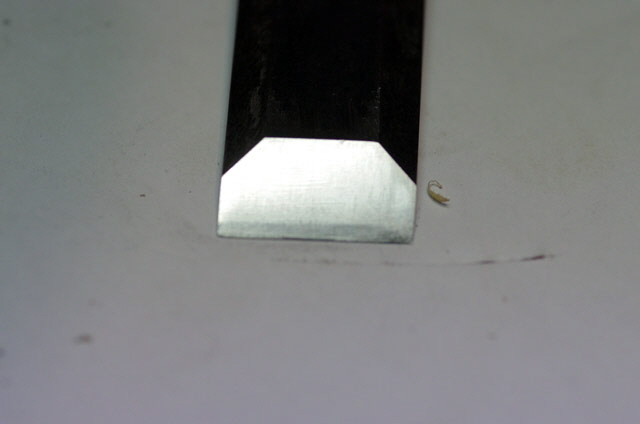
Figure 6. Cheap and Nasty Honing Guide Rocks (Not Good) Causing Curved Cutting Bevel
Maybe I can do better by my making my own precision honing guide? Let’s start by determining some design parameters.
Everything I’ve read suggests that clamping to the sides of the blade is best. Top clamps tend to suffer from inadvertent blade rotation during honing.
While a single wide roller is good for blade stability, two independent rollers enable you to move a blade from side to side while maintaining the cutting angle in contact with the abrasive. The change in grinding pattern viewed under a light will indicate where the blade is currently being ground which is somewhat more convenient than using a felt marker or bearing blue. Two rollers also allow setting a wide support base for thin blades and always has a three point contact with the abrasive media. So two independent rollers are required.
All of my chisels and planes have parallel sides. The plane blade sides are flat with a constant thickness of about 2 mm from heal-to-toe, The chisels edges have a mitre with a heal-to-toe taper ranging from slightly greater than 4 mm at the heal to under 2 mm at the toe. My widest plane blade is just over 2” and my thinnest chisel is 1/4”. The honing guide will need to hold this range of blades securely, with a consistently accurate set.
The heal-to-toe taper on chisels can causes grief for side clamping honing guides with machined (or cast) mitre profiles in the clamping faces. These can cause two point contact between the mitre edges of the chisel and the guide clamp which prevents the blade from sitting square in the guide. So my honing guide needs to have flat clamping faces.
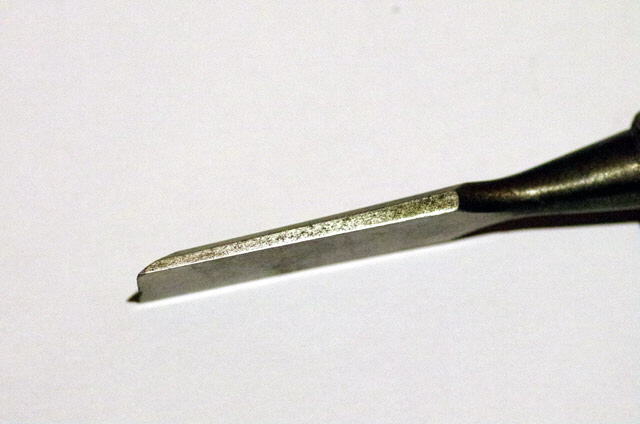
Figure 7. Basher’s Chisel Showing Typical Heal to Toe Taper
My oil stones (I have two which provides four sides for ensuring that they are flat and true) are a fraction over 2” wide. The honing guide rollers need to sit on the stone for all of my tool blades.
On abrasive media, I have some cheap diamond impregnated aluminium plates which are great for removing material fast, but these are not dead flat. I also use carborundum paper in various grades ranging from 120 to 1200 grit on a flat surface from time-to-time, but my main-stay for honing are my oil stones. For final polishing I use a leather strop with general purpose polishing compound and a buffer wheel.
The honing guide needs to handle oil, turpentine, methylated spirits and water without rusting or corroding. These liquids are used to ‘float’ micro particles of cut metal off the active abrasive surface. The abrasive media is necessarily relatively hard compared with your tool blade (and diamond is as hard as you can get). Clogging your abrasive with micro-particles of your tool blade or lubricants will slow down the abrasive action.
The guide needs to do micro-bevels for those that want them. It also should allow setting up for other cutting angles up to say 30 degrees.
So with some parameters determined I set about designing my honing guide.

Figure 8. Precision Honing Guide Design Concept
Initially I figured that the critical side pieces would need to be made from steel or aluminium plate, but before committing to the design and machining these, I tried 3D printing the parts. The printed parts turned out to be accurate and robust so no tricky machining was required. Another advantage of 3D printing a development project like this is that I could easily adjust the design. It took three iterations to refine the side clamping brackets.
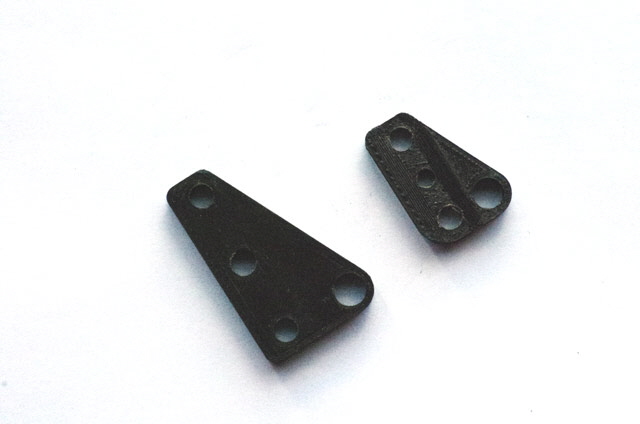
Figure 9. First Two Side Clamp Design Iterations
The honing guide also needs some ground steel rods (recycled 6 mm diameter laser printer rollers), an M6 x 1.0 threaded rod and nut to suit. In addition to the printed sides I machined four brass bushings, two brass bosses, two Nylon roller wheels and a Nylon taper washer on my lathe from scrap material. Most of these parts could also be 3D printed as opposed to machined.
The entire project (design to finished item) would have been completed in an afternoon but I’ve run out of M2 hex head set screws. While I could improvise by machining some M2 screws this will make for a slotted head which isn’t ideal.
The guide rods are a press fit with lock-tight on the non-bossed side and the threaded rod is threaded with lock-tight on the opposite side. The guide rod bosses are a little bit tight as I don’t have a 6.10 mm drill bit or an appropriate hone but I figure they will wear in over time.
Although the set screws aren’t yet fitted the guide is already so much better than the cheap commercial offerings above. It is simple, easy to set up, securely clamps my range of tool blades, and ensures a consistent 25 degree cutting angle with a perfectly square cutting edge every time. Whoot!
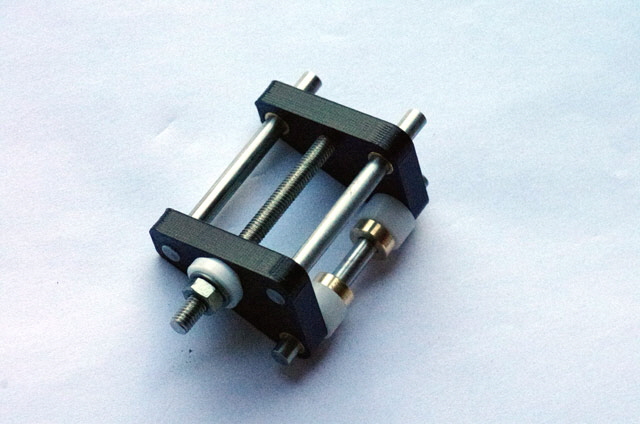
Figure 10. New Honing Guide - Precise, Square, Simple and Secure
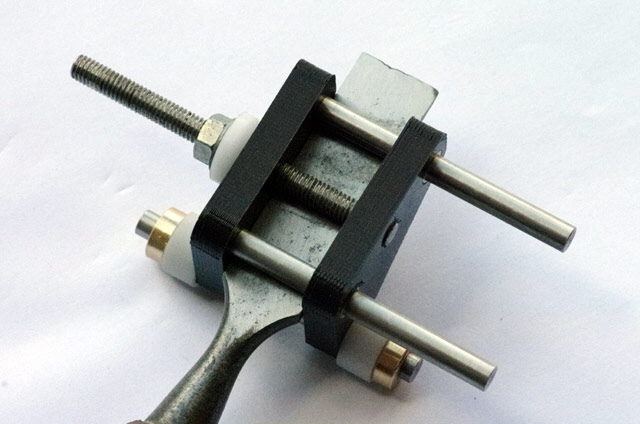
Figure 11. Basher’s Chisel in Honing Guide
(Ready for sharpening.)
Note that the blade is clamped between the side faces against the lower side of the guide rods by tweaking the nut just beyond finger tight. This ensures a constant cutting angle no matter how thick the blade is. Even though the blade is below the guide bars I assure you it is a positive and secure clamp that will not inadvertently move during honing.
I fitted M2x0.4 grub screws to the bosses. While they work just fine they are much smaller than necessary and I’ll be changing these to M3x0.5 in due course. Other potential modifications include an M6 wing nut to replace the hex nut (no spanner required) changing from Nylon to brass rollers and taper washer, and milling anodized aluminium plate sides.
I also 3D printed a setting template to ensure a consistent blade protrusion for a cutting angle of exactly 25 degrees. The template has an array of holes in it for aesthetics and to conserve printing filament. I won’t bother printing a 30 degree guide for now because I don’t anticipate ever having to use one, but the design is similar.
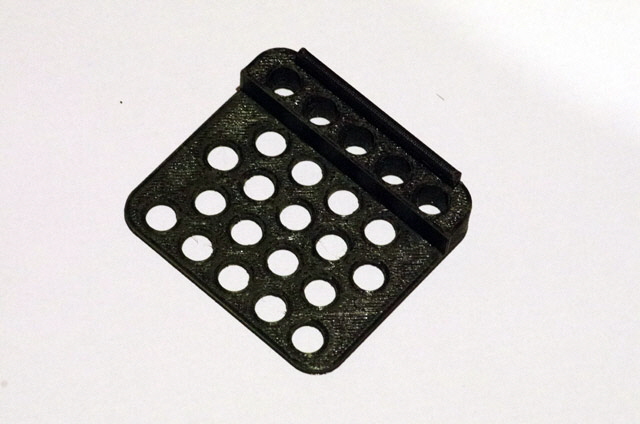
Figure 12. 25 Degree Setting Template
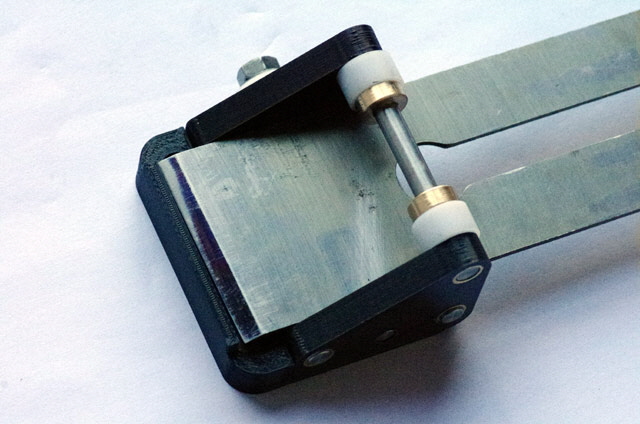
Figure 13. Plane Blade Set in 25 Degree Template
(Note that the original hone is not square as shown with felt pen and abrasions!)
Honing Guide Instructions
This honing guide is capable of producing ‘scary sharp’ cutting edges. Take sensible precautions to prevent a cut injury. A honed cutting edge can be damaged by contact with hard objects. Rest planes and their side, avoid hard obstructions such as nails in use, and avoid impact with hard surfaces and other tools.
If a blade is chipped, severely worn, or the cutting angle is being changed then start with an approximate regrind to the desired angle on a bench grinder. Honing to remove a large amount of the blade material will take appreciable time.
Clean the sides of the blade. Then flatten the back of the blade to at least 12 mm (1/2”) from the cutting edge, working through your abrasive media grades.
Slacken off the honing guide roller bosses. Determine if the guide rollers will be positioned between or on the outside the side clamping plates based on the blade width and the dimensions of the abrasive. Position the rollers and bosses accordingly but do not fix the bosses. Wipe the rollers clean.
Lay the honing guide upside down on the setting template. Place the blade flat side down (cutting bevel up) on the steel guide rods and slide the cutting edge to the template stop.
Tighten the clamp nut a tweak past finger tight and set the rollers to freely rotate against the side clamps with the bosses.
Ensure your abrasive media is flat and true. Plate glass or a ceramic tile work well for carborundum paper. Apply an appropriate honing fluid. MDF can be used with dry buffing compounds but is likely to swell if wet.
Place slight downward pressure near the cutting edge when honing. Stroke the blade backwards and forwards across the abrasive, driving from the heal of the blade. Keep the rollers in contact with the abrasive. Excessive downward pressure on the blade is not required - let the abrasive do its work.
To observe the honing pattern rotate the blade from side to side in a small arc. Alternatively use a felt marker to coat the ground bevel and complete a light grinding stroke. Observe the high point pattern on the bevel under a lamp. An even scratch pattern over the bevel indicates that honing is completed with the current abrasive grade.
If this is an initial hone then reset the blade in the template once the cutting edge profile has been established on the coarsest abrasive and re-hone to prevent forming an excessive cutting angle.
Progress to the next (higher grade) abrasive or polishing.
Polish with a leather strop or on MDF with polishing compound. Work both the bevel and back of the blade to remove the cutting edge bur and produce a mirror finish.
My honing guide is pretty darn good even if I say so myself. If I have to cause to remove and reset a blade it aligns square and at 25 degrees perfectly. The blade clamp is very secure and the blade simply won’t move during honing. And the results are consistently ‘scary sharp’.
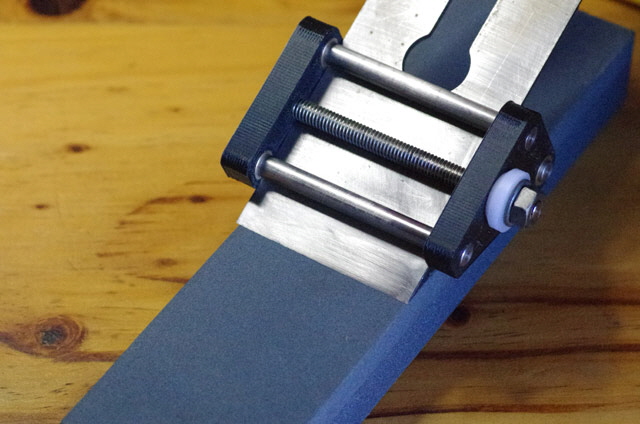
Figure 14. Plane Blade on the Oil Stone
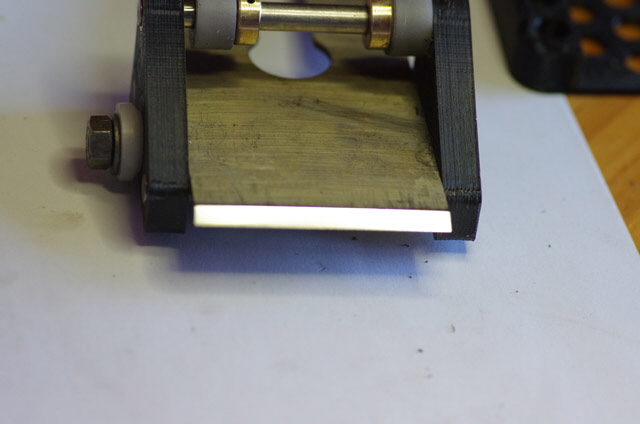
Figure 15. Stropped and Polished ‘Scary Sharp’ Plane Blade
(See Figure 1 for cutting action.)
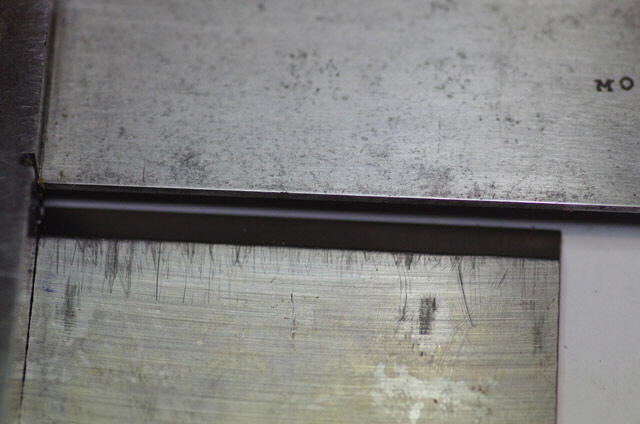
Figure 16. Cutting Edge Honed Dead Square with Shank Over 2 1/4”
After the very first honing successive efforts should be a breeze requiring removal of minimal blade material and ensuring an optimum angle and a square cutting edge. Now all I need to do is resharpen all of my chisels and planes so that the cutting edge is 25 degrees and truly square to the the blade shank!
I’m so pleased with the prototype that I’ve modified the design to hone inclined and rounded cutting edges. The new design has the honing guide made entirely from stainless steel and brass. It has been optimized for production with fewer parts, fewer machining operations, easier assembly, and stock material sizes. The triangular side clamps will be an interesting test of my hobby CNC mill’s capability. The setting template and angular inserts will still need to be plastic. If the tool finds a market I’ll be having these injection moulded.
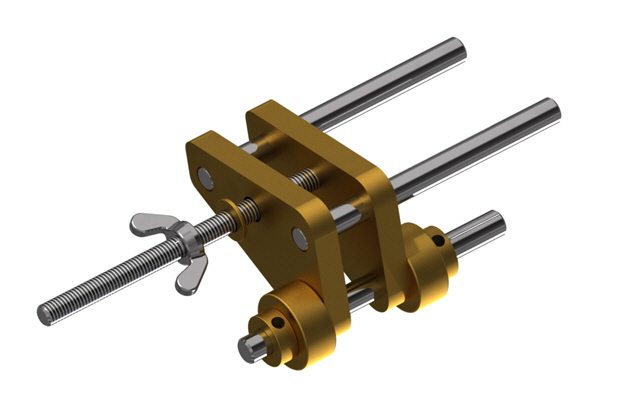
Figure 17. All Metal Honing Guide
|